Hi, I'm Takeo Fujii. I'll explain "Image compression to speed up WordPress display speed".
By reading this article, you can improve the display speed of your site and create a website with much less stress on page loading.
There is no charge for this service. We will also introduce some paid options, but you are free to use them or not.
First, let me explain what image compression is.
- 1 What is image compression?
- 2 Why speed up the display speed of your website?
- 3 Does image compression change the page display speed?
- 4 Image compression" method to improve site display speed
- 5 How to use ShortPixel for super effective image compression (step by step)
- 6 Enter the API key in ShortPixel.
- 7 How to set "ShortPixel" to accelerate display speed
- 8 Improve display speed with ShortPixel's "Advanced
- 9 Conclusion: Improve display speed with image compression
What is image compression?
Why do I need to compress the image files in my WordPress site?
The reason for this is simple. It's because image compression reduces the amount of data.Reduce the amount of data without compromising image quality.You can do it.
If you try to display an image with a large file size as it is, it will take a long time to load. However, if you can reduce the amount of data, you can greatly improve the speed at which the page loads.
Image compression can be a very effective way to speed up the display speed.
So, why do we need to speed up the display speed of our websites?
Why speed up the display speed of your website?

StatisticsAccording to the National Institute of Standards and Technology (NIST), 40% users will give up reading a page and leave if the web page takes more than 3 seconds to load.
In other words, even if the content is of good qualitySlow pages are a pain for visitors.That's what I mean.
Have you ever had the frustrating experience of surfing the Internet and not being able to see the page?
A slow loading page can cause stress to visitors.
Page display speed is related to Google's SEO strategy.
And to add to that.Page loading speed is also extremely important from the perspective of Google's SEO strategy.It is.
Speed Update, an algorithm update introduced by Google in 2018, explains how the speed at which a site is displayed may have a bearing on its search result rankings.
If the page display speed is slow, it will be detrimental to your SEO strategy.
How can I quickly improve the display speed of my WordPress site?
How to maximize speed efficiently and without stress"Image compression."It is.
Does image compression change the page display speed?
It will change." It's not just a theory, it actually changes the speed at which the page is displayed.
See the example on this site. This is the page speed before image compression.
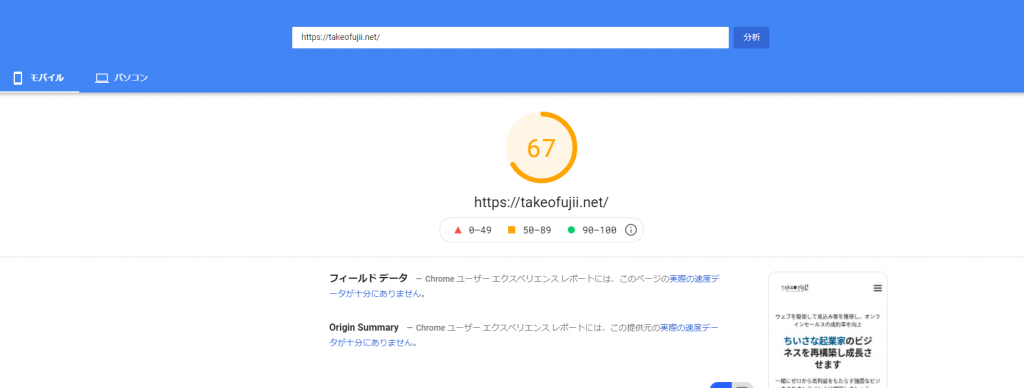
I used PageSpeedInsights provided by Google to measure the speed of the mobile display. The result is shown in the image above.
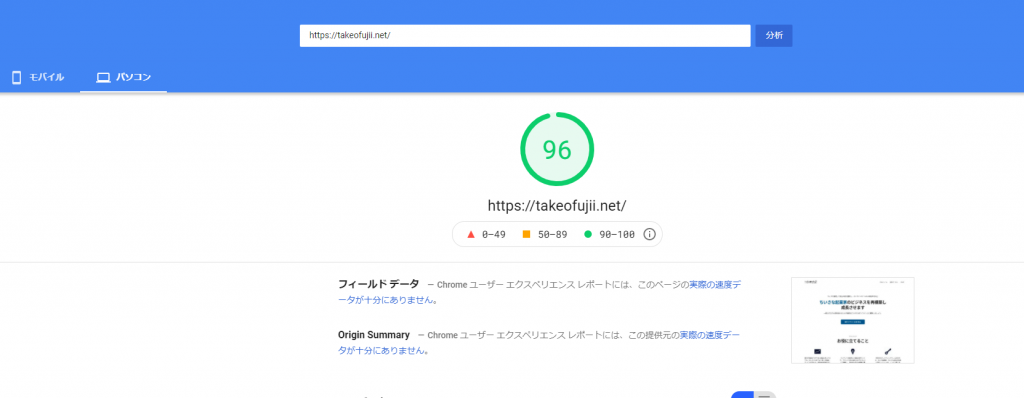
In the display view, the score is 96 with no problem. However, you can clearly see that the page speed is slow in the mobile display.
Page speed after image compression
So how did it change after image compression?
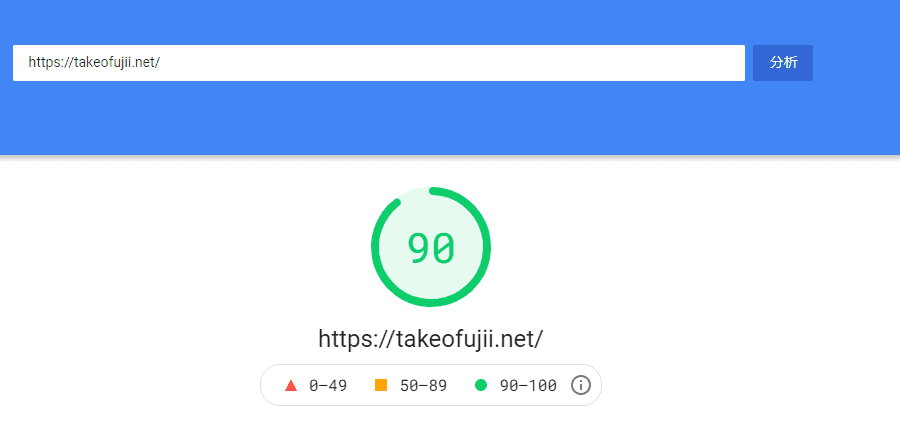
90 points for mobile.

It also scores 94 on the display view. This is a dramatic improvement, especially for the mobile display.
The result above is just image compression, no other work was done to speed up the website display.
If you want to radically improve the display speed of your WordPress site, please read the article below first.
>>[Latest] Causes of slow WordPress display speed and how to make it super fast in 15 minutes
In this section, I will explain in detail the "image compression method" that has greatly improved the site display speed.
How to "compress" images to improve site display speed
Let's get started with how to compress the images in your WordPress site.
This time, I'm going to use a free WordPress plugin for image compression.ShortPixelUse the
I've used a number of image compression plug-ins and finally settled on ShortPixel.
I also wrote a specific review article. See below.
This page explains how to use & set up ShortPixel specifically.
If you are aiming for the same page display speed as me, please take a look at it and implement it as is.
However, depending on your website settings, you may experience problems. It is your own responsibility. Make a backup just in case. Backups are explained in Settings.
Here I'll write down the steps and flow to further compress images and speed up the display speed of your site. I will also explain each of them with specific points.
If you have any questions after reading this article to the end, please feel free to leave them in the comments section below the blog. If you have any questions, please feel free to write them in the comment box below the blog. I will answer.
Now let's get into the specific steps and procedures.
How to use ShortPixel for super effective image compression (step by step)
The first step is to install ShortPixel from the WordPress dashboard.
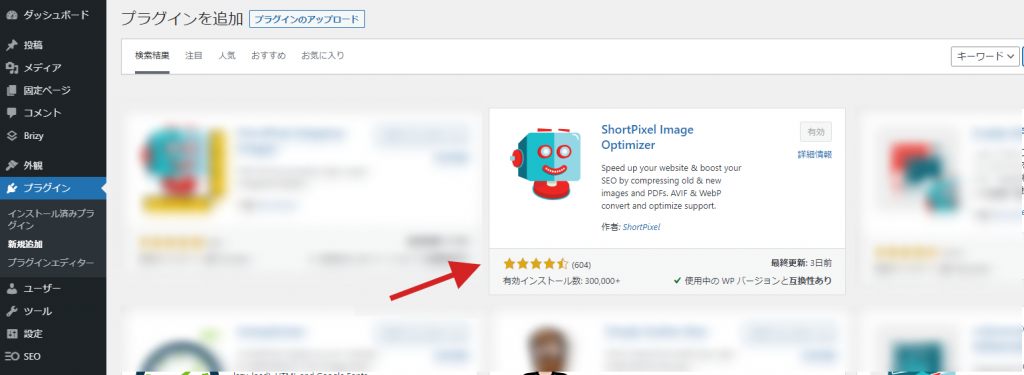
Please activate it after installation.
The next step is to obtain the API key that is required to run ShortPixel. It's free and easy to get, so get it quick and easy.
How to get an API key for ShortPixel
First.Here is the official pageAccess the
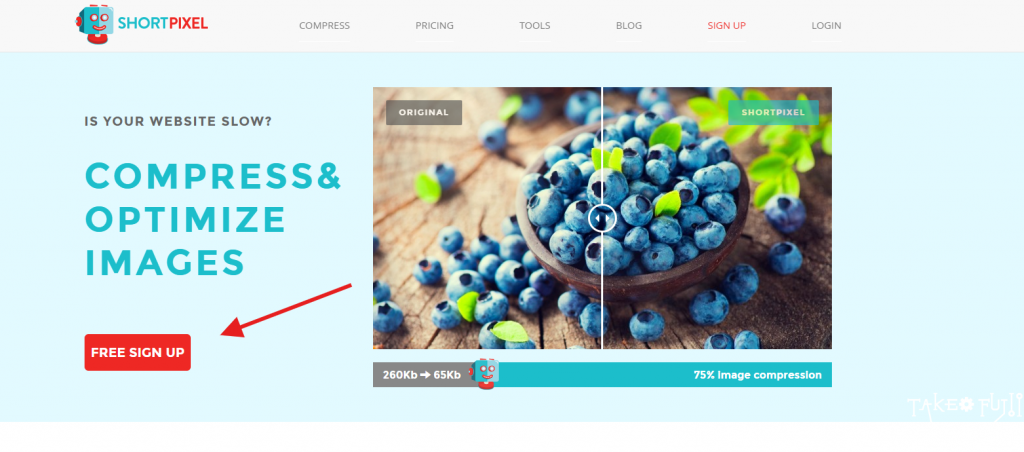
Click on the red button labeled "FREE SIGN UP".
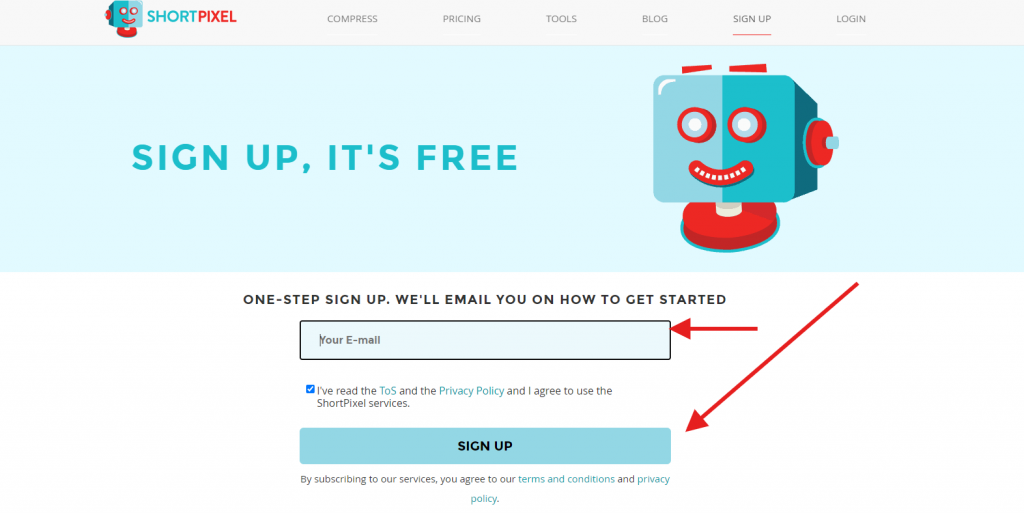
Enter your email address. Then, after checking the confirmation box below, click the button that says "SIGN UP".

Yes, that's it. That's it, you should see the API key for ShortPixel.
If you make a mistake and close the page here, don't worry. The API key has been sent to the email address you just entered. Please check it.
The API key obtained here will be used in the ShortPixel configuration, so please copy the API key.
Enter the API key in ShortPixel.
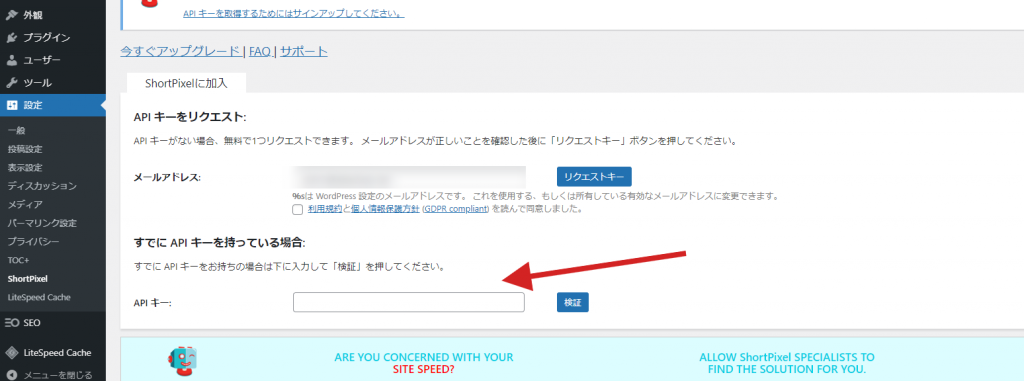
From the WordPress admin panel, go to [Settings] > [ShortPixel], and you will see a page where you can enter your API key.
There is a section called "If you already have an API key. Enter the API key that you have just obtained here. This will complete the authentication of your ShortPixel API key.
By having the API key authenticated here, you can use ShortPixel to compress 100 images per month.
Now, here comes the main setup.
To dramatically improve the display speed of your WordPress site, you need to use speed-oriented settings. This article explains how to set up image compression with ShrotPixel to get the most speed increase.
How to set "ShortPixel" to accelerate display speed
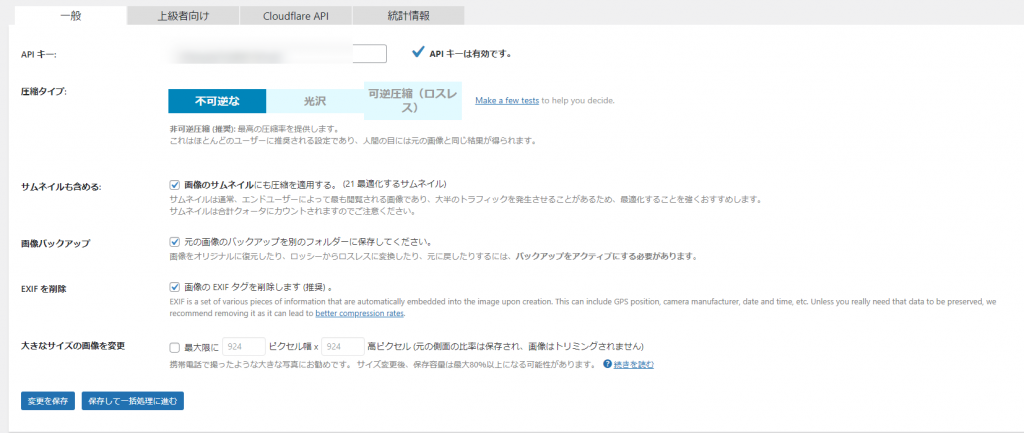
These settings are important to improve the display speed, and I will explain them one by one. Here are the settings.
- Compression type:Irreversible (Lossy)
- Include thumbnails:Check.
- Image Backup:Check.
- Delete EXIF:Check.
- Change the large size image:Width 1,200 x Height 675
Supplementary information. Be sure to read it.
First of all, the compression type is set to "Lossy" which is the most image compression available. This is super-compressed, but the difference in image quality is not so great that it can be seen with the naked eye.
Also check the thumbnails. Compression is recommended for thumbnails as well, since they are displayed more often.
Image backup is my preference. However, I keep a backup for insurance purposes in case I want to start over as a result of image compression.
I also entered the option to change the large size image. This is where the settings get tricky. To be honest, the above size setting is fine if you are using it for blogging purposes.
If you are creating a portfolio site, please do not include this size specification.
This is a setting to improve the display speed by compressing the image to the very limit so that the image quality is not degraded.
Next, move on to "Advanced Settings".
Improve display speed with ShortPixel's "Advanced
You can further improve the display speed by customizing the "Advanced" settings.

Select "Advanced" next to the General tab.
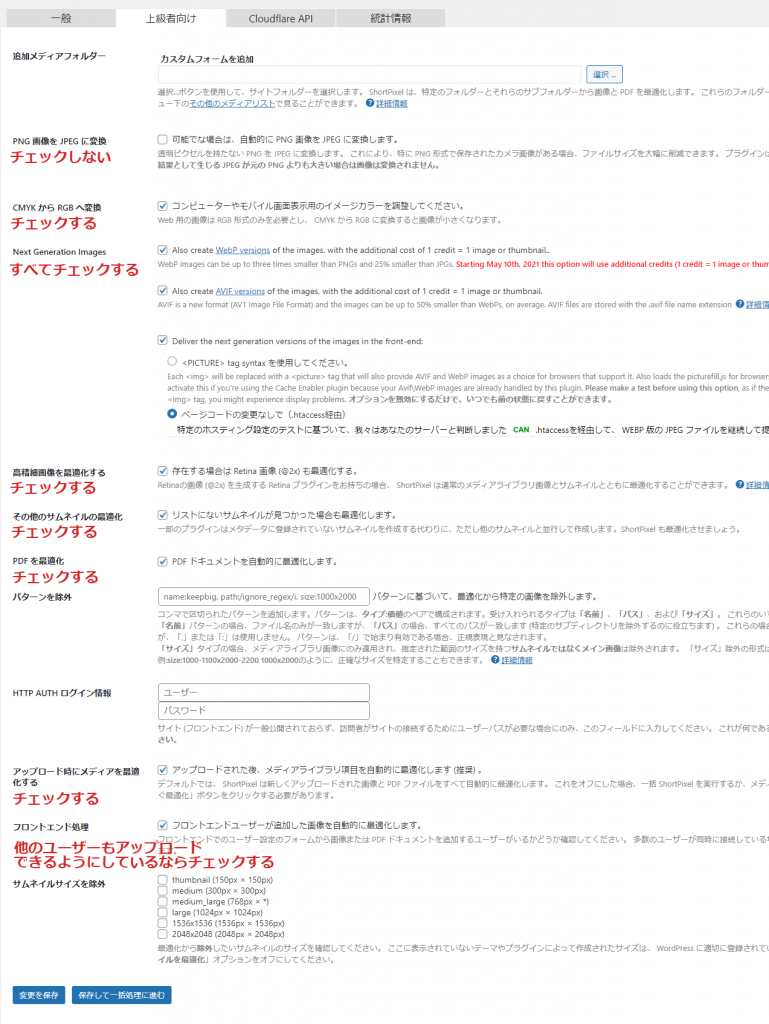
- Convert PNG image to JPEG: Unchecked
- CMYK to RGB conversion: Check
- Next Generation Images: Check all.
- Without changing the page code (via .htaccess): check
- Optimize high-definition images: Check.
- Optimize other thumbnails: Check.
- Optimize PDF: Check
- Optimize media on upload: Check.
- Front-end processing: check
I'll add something here as well. This is an advanced setting only, and the idea here comes down to the individual site.
I did not check the "Convert PNG images to JPEG" option. I did not check the "Convert PNG to JPEG" checkbox because of the risk of losing transparency in PNG format. However, there is a good chance that JPEG images will be lighter than PNG images. The image quality will degrade somewhat...
However, if the website you are running is not the type that is mainly attractive with images, then checking this box is an option. You can check this box if you want images of normal quality, as light as possible, and as viewable as possible.
Optimize PDF" is checked, but you can remove it if you don't handle PDF files. Front-end processing can also be unchecked if you don't need it.
All that is left is to compress the image with ShortPixel.
Conclusion: Improve display speed with image compression
This article explained how to use ShortPixel to dramatically improve the display speed of your WordPress site.
The "Advanced" settings should be configured according to the purpose of your website. The basic settings alone are enough to speed up the process. Don't forget to back up your data.
If you want to know more about what you can do with ShortPixel, please check out my detailed review article.
If you have any questions about using it, please feel free to leave them in the comments section below this article. I will reply within 12 hours on average.
See you soon.








![Genesis Framework Usage and Discount Sale Information [2024]. Genesis Framework Usage and Discount Sale Information [2024].](https://takeofujii.net/wp-content/uploads/2022/11/genesis-framework-485x273.png)






Latest Comments